EE-107 Engineering Drawing Oct-Nov 2024 paper solved: cycloid, projections of a cone and section of a square prism
 Nookesh Karri ·· 43 min read

This post solves the AP SBTET C-23 first year engineering drawing question paper 2024 (EE-107, October/November 2024 board exam). It answers all 4 Part A questions and all 6 Part B questions. For each question you first get the idea in simple words, then the exam answer: numbered steps of construction and the finished drawing, drawn to scale from computed points. You can open the original question paper PDF next to this page and check every question and figure.
Engineering Drawing question paper 2024: pattern and syllabus chapters
The EE-107 Engineering Drawing paper of October 2024 is a common first year paper for many branches (its code line reads C23-AEI-BM-CH-CHST-CHOT-CHPC-CHPP-EE-EEVT-TT–107). It is 3 hours long and carries 60 marks. Part A has 4 questions of 5 marks each (20 marks, all compulsory). Part B has 6 questions of 10 marks each, and you answer any four (40 marks).
The paper does not print the marks beside each question. The marks come from the instructions: every Part A question is worth 5 and every Part B question is worth 10. The questions follow the chapter blueprint of the C-23 curriculum exactly: 2, 1, 1, 0 and 0 short questions and 0, 1, 2, 1 and 2 essay questions from Chapters 1 to 5.
Part A instructions as printed on the paper (PART—A, 5×4=20):
Instructions : (1) Answer all questions.
(2) Each question carries five marks.
(3) All the dimensions are in mm.
Part B instructions as printed on the paper (PART—B, 10×4=40):
Instructions : (1) Answer any four questions.
(2) Each question carries ten marks.
(3) All the dimensions are in mm.
| Q no | Topic | Syllabus chapter | Marks |
|---|---|---|---|
| 1 | Single stroke vertical lettering, 10 mm | Ch 1 Drawing instruments, lettering and dimensioning | 5 |
| 2 | Redraw a plate with parallel dimensioning | Ch 1 | 5 |
| 3 | Tangents from a point to a circle | Ch 2 Geometric constructions | 5 |
| 4 | Projections of a line in VP, 45° to HP | Ch 3 Projections of points, lines, planes and solids | 5 |
| 5 | Cycloid of a 50 mm circle | Ch 2 | 10 |
| 6 | Projections of a rectangular plane | Ch 3 | 10 |
| 7 | Projections of a cone, axis 60° to VP | Ch 3 | 10 |
| 8 | Section of a square prism | Ch 4 Sectional views | 10 |
| 9 | Orthographic views of a stepped block | Ch 5 Orthographic projection | 10 |
| 10 | Orthographic views of a ribbed block | Ch 5 | 10 |
The paper has two misprints in Q5: “roils” for “rolls” and “begining” for “beginning”. The questions below copy them exactly, and they do not change what you must draw.
How this post draws. Every figure is drawn to scale from computed points. Each one is meant to be drawn full size on your sheet, at scale 1:1, so 1 mm on the object is 1 mm on paper, and all dimensions are in mm. (A scale of 1:2 would mean 1 cm on paper shows 2 cm on the object.) In the drawings, thick lines are visible edges. Thin lines are construction lines and projectors. Dashed lines are hidden edges, and chain lines (long dash, dot) are centre lines and cutting planes.
My advice: in Part B, pick Q5, Q8, Q9 and Q10. The cycloid and the prism section have fixed steps, so every step earns marks. Q9 and Q10 only need you to read the pictorial figure slowly and place the views correctly. Take Q7 if you have practised two-stage solids. Leave Q6, because the plane is tilted to both HP and VP, and that is one step beyond the syllabus limit for planes.
You can see every Engineering Drawing session on the Engineering Drawing subject page.
Q1. Print the following in single stroke capital vertical lettering of size 10 mm : (5 marks)
Question (as printed):
- Print the following in single stroke capital vertical lettering of size 10 mm : “IMPORTANCE OF ENGINEERING DRAWING”
Understand it first
- Lettering means writing titles, notes and numbers on a drawing by hand, in a fixed neat style.
- Single stroke means each part of a letter is drawn with one stroke of the pencil. The line is as thick as the pencil point. You do not draw a hollow outline and fill it.
- Capital means upper-case letters only: A, B, C. Vertical means the letters stand straight up, at 90° to the guide line. (Sloped lettering leans to the right at 75°.)
- Size 10 mm means the height h of every capital letter is 10 mm.
- Guide lines are two thin, light lines drawn 10 mm apart. Every letter sits on the lower line and touches the upper line. They keep all letters the same height.
- The BIS code SP 46 gives the proportions of “type B” lettering as fractions of h. For h = 10 mm these are:
- line width d = h/10 = 1 mm,
- gap between letters a = 2h/10 = 2 mm,
- gap between words e = 6h/10 = 6 mm,
- pitch between two lines of upper-case text b = 13h/10 = 13 mm.
- The width of a letter is not one fixed number. In this post most letters are about 6 mm wide (0.6 h). M and W are wider (about 8 mm), and I is a single line.
It works like a ruled notebook. The lines keep every letter the same size, so the page stays neat even when you write fast.
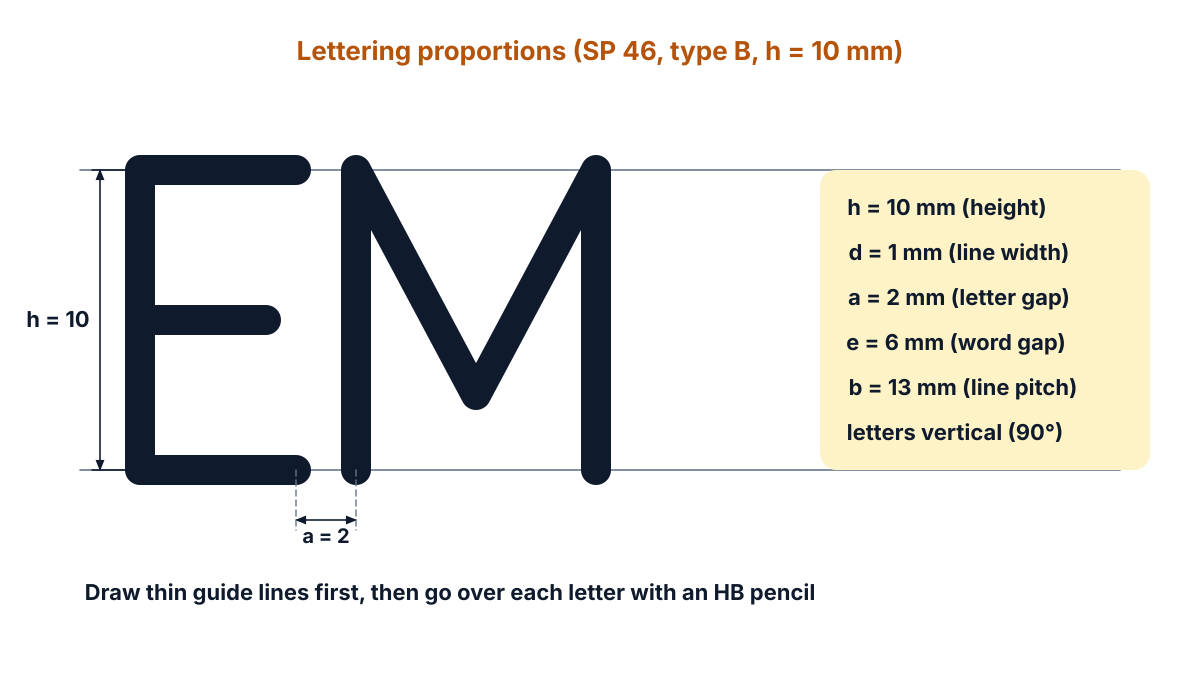
Figure Q1a: lettering proportions for h = 10 mm (type B): height 10, line width 1, letter gap 2, word gap 6.
Exam answer (5 marks)
Steps:
- Guide lines: draw two thin horizontal guide lines 10 mm apart with a sharp 2H pencil, long enough for the whole title.
- Spacing: plan the title: about 6 mm per letter (8 mm for M and W), a 2 mm gap between letters and a 6 mm gap between words.
- Letters: draw each capital letter upright (90° to the guide line), touching both guide lines, with single strokes.
- Line width: go over every letter with an HB pencil so that all strokes have the same thickness, about 1 mm (h/10).
- Finish: check that the title reads “IMPORTANCE OF ENGINEERING DRAWING” in one line, with uniform height, width and spacing, and leave the guide lines faint.
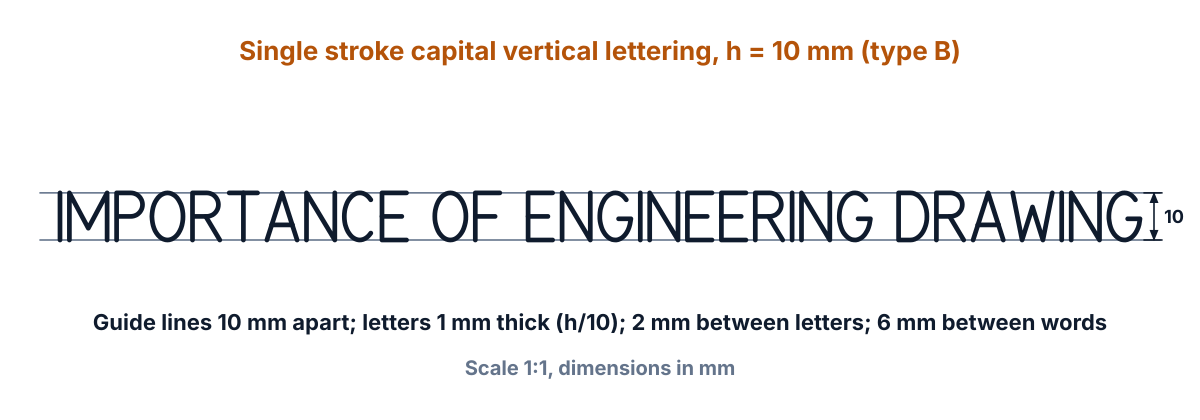
Figure Q1b: the title in single stroke capital vertical letters, h = 10 mm (drawn to scale; draw it full size, scale 1:1, on your sheet, all dimensions in mm).
Key points to write: guide lines 10 mm apart; capital, upright, single stroke; uniform 1 mm strokes; 2 mm between letters, 6 mm between words.
Q2. Redraw the following figure to the full scale using parallel dimensioning method. (5 marks)
Question (as printed): 2. Redraw the following figure to the full scale using parallel dimensioning method.
[Figure: a plate. Its printed dimensions are 60 (from the centre of the big arc to the right edge), three 20 mm steps down the right edge, 50 (bottom edge to the centre of the big arc), 70 (left edge to the centre of the small hole), R30 (big corner arc), R20 (circular hole), R20 (bottom-right corner arc) and φ 10 (small hole).]
Understand it first
- Full scale means scale 1:1. A line that is 60 mm on the object is 60 mm on your sheet. (Scale 1:2 would mean 1 cm on paper shows 2 cm on the object.)
- Dimensioning means writing the sizes on a drawing with dimension lines, extension lines, arrowheads and numbers.
- An extension line is a thin line that comes out from the object. A dimension line is a thin line with an arrowhead at each end, drawn between two extension lines. The number sits above the dimension line.
- Chain dimensioning puts the dimensions one after another, like links of a chain. The paper’s figure uses this style on its right edge (20, 20, 20).
- Parallel dimensioning measures every size from one common edge, called the datum or base line. The dimension lines are drawn parallel to each other and spaced out. The BIS code SP 46 calls this “dimensioning from a common feature”.
- Parallel is safer. In a chain, small errors add up from one link to the next. From a datum, each size is measured on its own, so errors do not pile up.
- R30 means a radius of 30 mm. φ 10 means a diameter of 10 mm. The hole marked R20 has a diameter of 40 mm.
A school measures children’s heights against a wall. You measure everyone from the same floor, not from the head of the previous child.
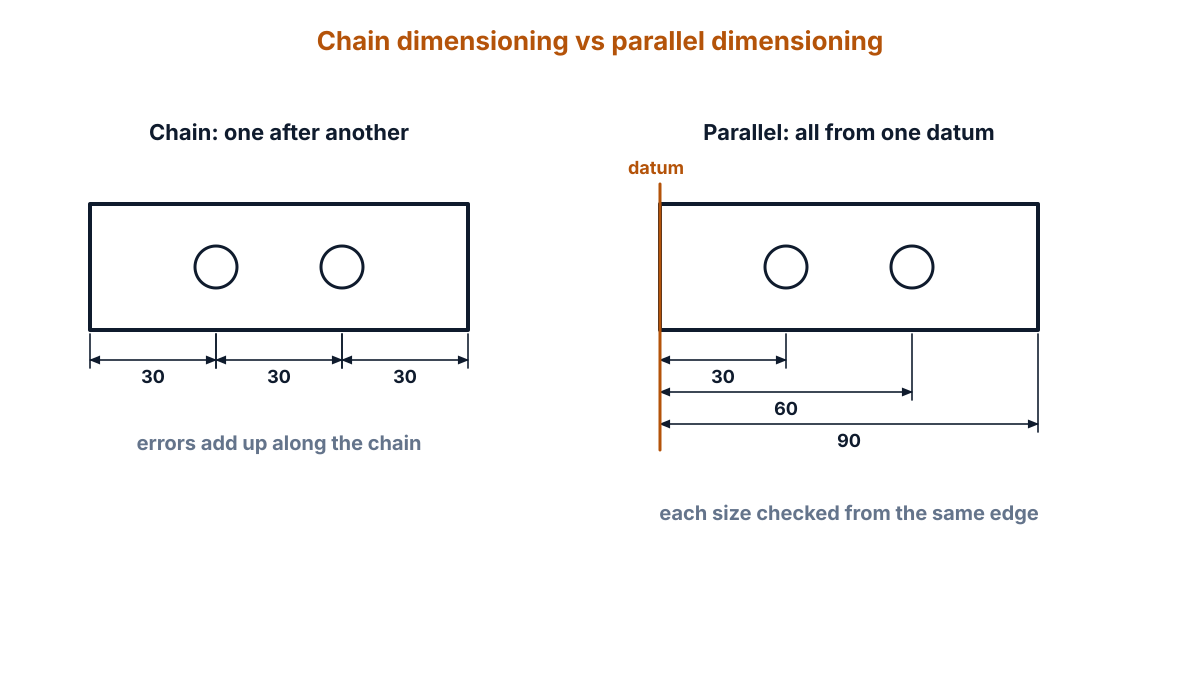
Figure Q2a: chain dimensions follow one another; parallel dimensions all start from one datum.
Reading the figure. Take the bottom-left corner as the origin. The left edge is vertical and touches the R30 arc at the arc’s centre height, so the centre of the big arc and of the R20 hole is 30 mm from the left edge and 50 mm up. The right edge is then 30 + 60 = 90 mm from the left edge, and the top is 50 + 30 = 80 mm up.
The small hole and the R20 corner arc share one centre, 70 mm from the left edge and 20 mm up (80 − 20 − 20 − 20 = 20). The slot on the right edge is 20 mm high (from 40 to 60 mm up), but its depth is not printed. Scaled from the printed figure, it is about 20 mm, so this answer draws it 20 mm deep.
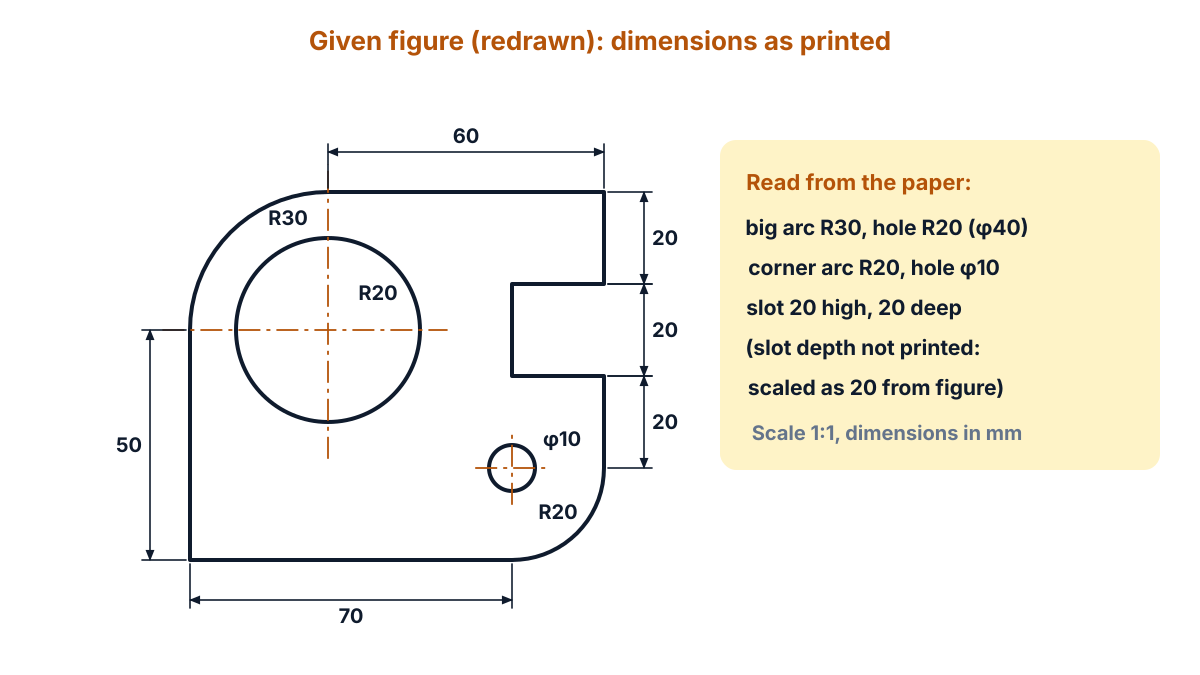
Figure Q2b: given figure (redrawn) with the printed dimensions; the slot depth of 20 is read from the figure.
Exam answer (5 marks)
Steps:
- Outline: take the bottom-left corner as datum. Draw the bottom edge 70 mm and the left edge 50 mm. With centre (30, 50) draw the R30 arc to meet the top edge at 80 mm. Draw the top edge to the right edge at 90 mm.
- Right edge and slot: draw the right edge down from 80 to 60, the slot 20 deep from 60 to 40, and the edge down to 20. Join it to the bottom edge with the R20 arc, centre (70, 20).
- Holes and centre lines: draw the φ40 hole (R20) at (30, 50) and the φ10 hole at (70, 20), with thin chain centre lines through both centres.
- Parallel dimensions: from the left edge draw 30, 70 and 90 as parallel horizontal dimension lines below the plate. From the bottom edge draw 20, 40, 50, 60 and 80 as parallel vertical dimension lines on the right side.
- Other sizes and finish: add R30, R20, φ40 and φ10 with leaders. Make the outline thick, and keep all dimension and extension lines thin with neat arrowheads.
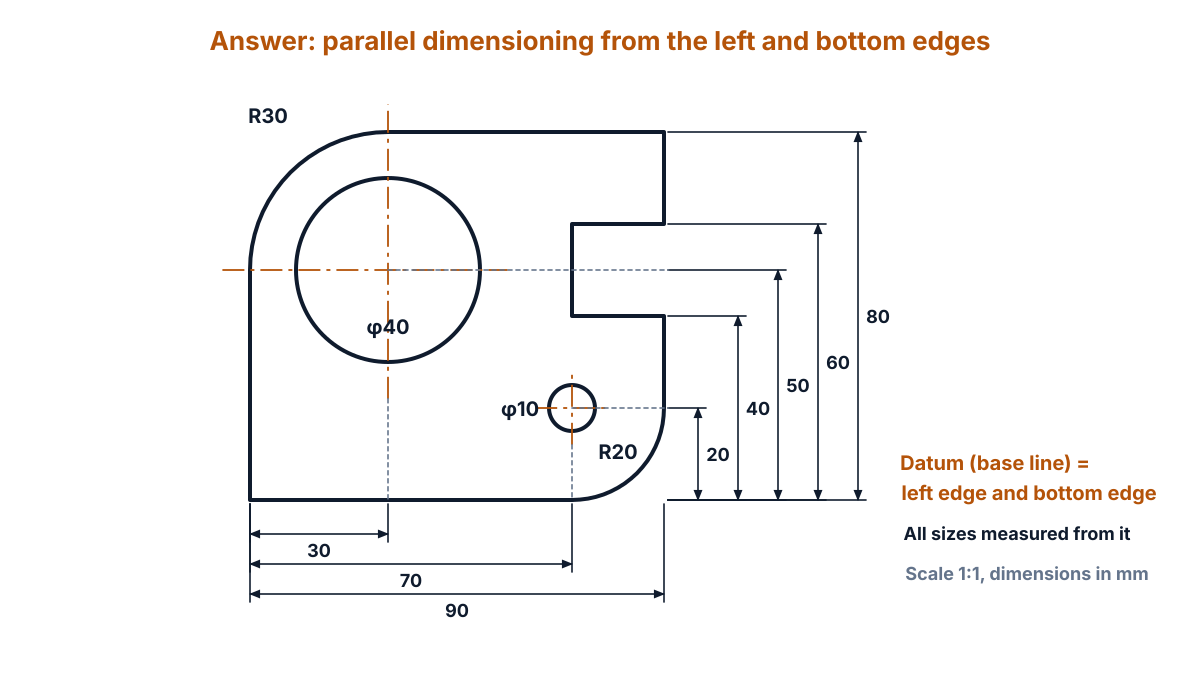
Figure Q2c: answer with parallel dimensions from the left and bottom edges (drawn to scale; draw it full size, scale 1:1, on your sheet, all dimensions in mm).
Key points to write: full size, scale 1:1; one datum for each direction; dimension lines parallel and spaced out; R and φ for arcs and holes; slot depth read as 20 mm.
Q3. Draw tangent to a circle of radius 35 mm from a point 75 mm away from its centre. (5 marks)
Understand it first
- A tangent is a straight line that touches a circle at only one point. That point is the point of contact, T.
- The radius drawn to the point of contact is always at 90° to the tangent. So angle OTP is a right angle.
- Any angle drawn in a semicircle is also 90°. If you draw a semicircle on OP as diameter, every point on it makes a right angle with O and P.
- So the point T must be on two curves at once: on the given circle, and on the circle with OP as diameter. Where the two circles cross, you get T₁ and T₂.
- From a point outside a circle you can always draw two tangents, one above and one below.
- You can check the length with Pythagoras: PT² = OP² − OT².
Picture a ball on the floor and a stick leaning on it. The stick touches the ball at only one point, and the line from the ball’s centre to that point is square to the stick.
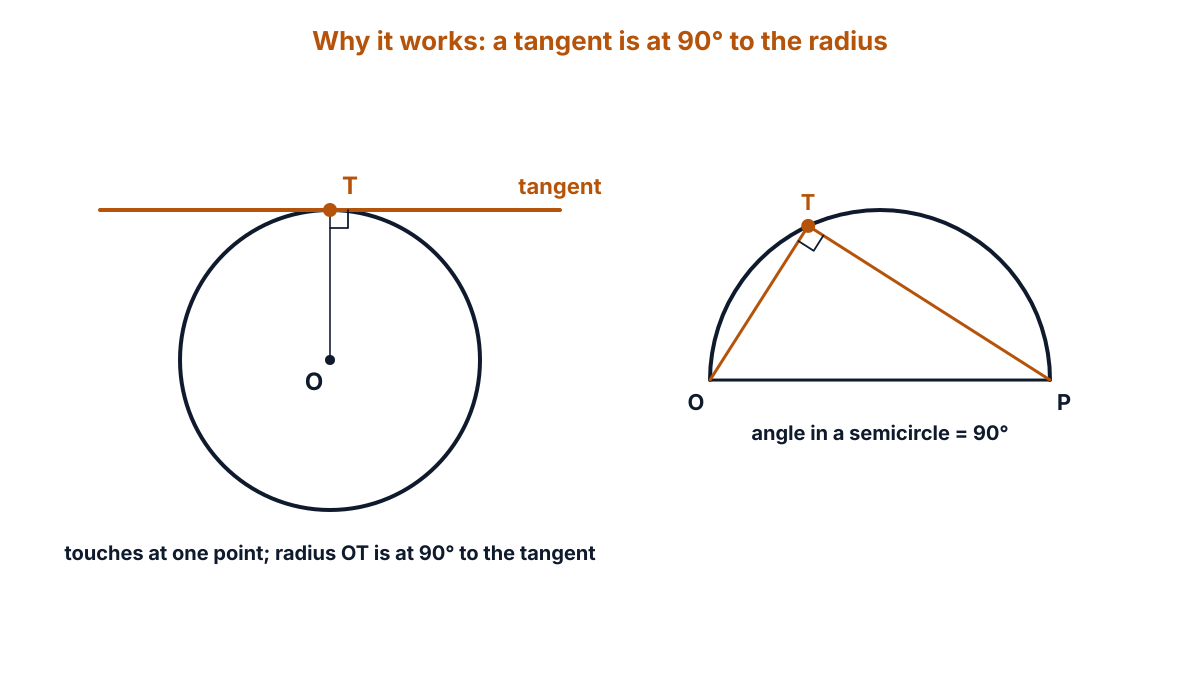
Figure Q3a: why the construction works: radius at 90° to the tangent, and the angle in a semicircle is 90°.
Exam answer (5 marks)
Steps:
- Circle: draw a circle of radius 35 mm with centre O.
- Point P: draw a line through O and mark P on it 75 mm from O.
- Bisect OP: bisect OP and mark the midpoint M (OM = 37.5 mm).
- Arc: with M as centre and radius MO = 37.5 mm, draw arcs that cut the given circle at T₁ and T₂.
- Tangents: join PT₁ and PT₂ and extend them a little. These are the required tangents. Each measures about 66.33 mm, because PT = √(75² − 35²).
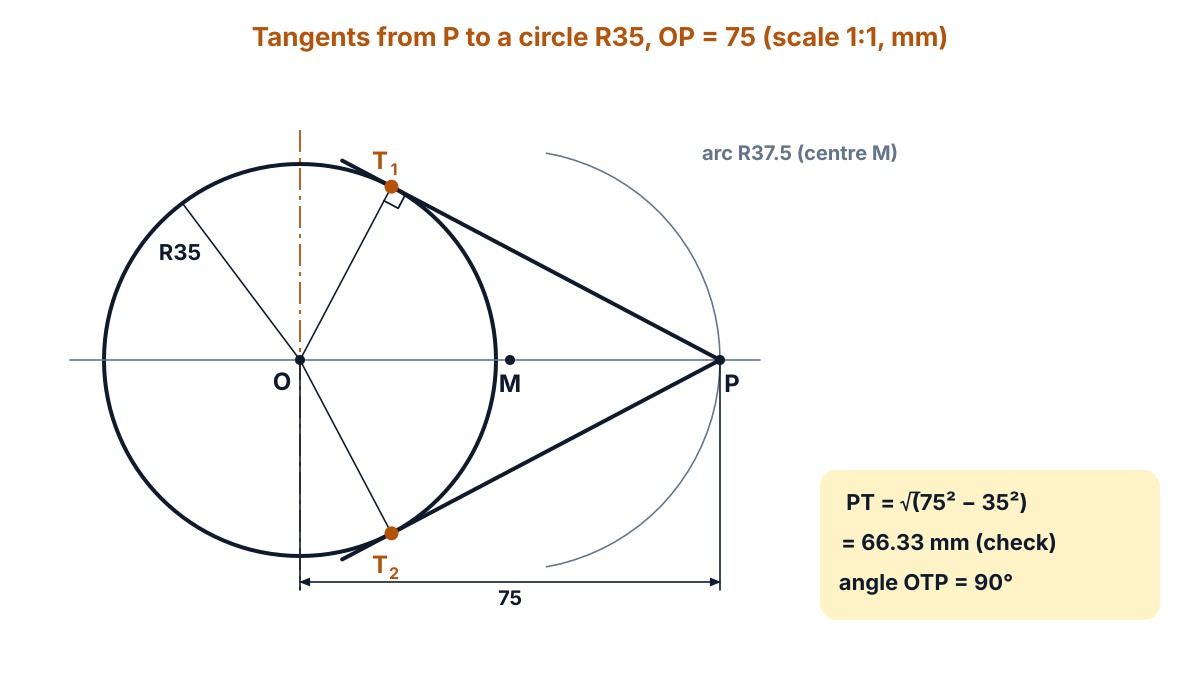
Figure Q3b: tangents PT₁ and PT₂ from P to the circle (drawn to scale; draw it full size, scale 1:1, on your sheet, all dimensions in mm).
Answer: two tangents PT₁ and PT₂, each about 66.33 mm long, touching the circle at T₁ and T₂.
Q4. A line of length 65 mm is resting in V.P. and makes an angle of 45° with H.P. (5 marks)
Question (as printed): 4. A line of length 65 mm is resting in V.P. and makes an angle of 45° with H.P. Draw the projections of line using first angle projection.
Understand it first
- H.P. is the horizontal plane, like the floor. V.P. is the vertical plane, like a wall behind the object.
- The two planes meet in a line called the XY line (or reference line).
- In first angle projection, the object sits in front of the VP and above the HP. The object is between you and the plane.
- The front view (elevation) is what you see looking at the object from the front. It is drawn on the VP. Points in the front view get a dash: a’, b’.
- The top view (plan) is what you see looking down from above. It is drawn on the HP. Points in the top view have no dash: a, b.
- After drawing, the HP is turned down by 90° about XY. So on paper, the front view is above XY and the top view is below it.
- A line that rests in VP lies on the wall itself. Its distance from VP is zero, so its top view lies on the XY line.
- A line parallel to a plane shows its true length (real length) on that plane. This line lies in VP, so its front view a’b’ is the true length, 65 mm, at the true angle of 45° to XY.
Hold a pencil flat against a wall, tilted at 45°. Seen from the front, you see its full length. Seen from above, it looks like a short line hugging the wall.
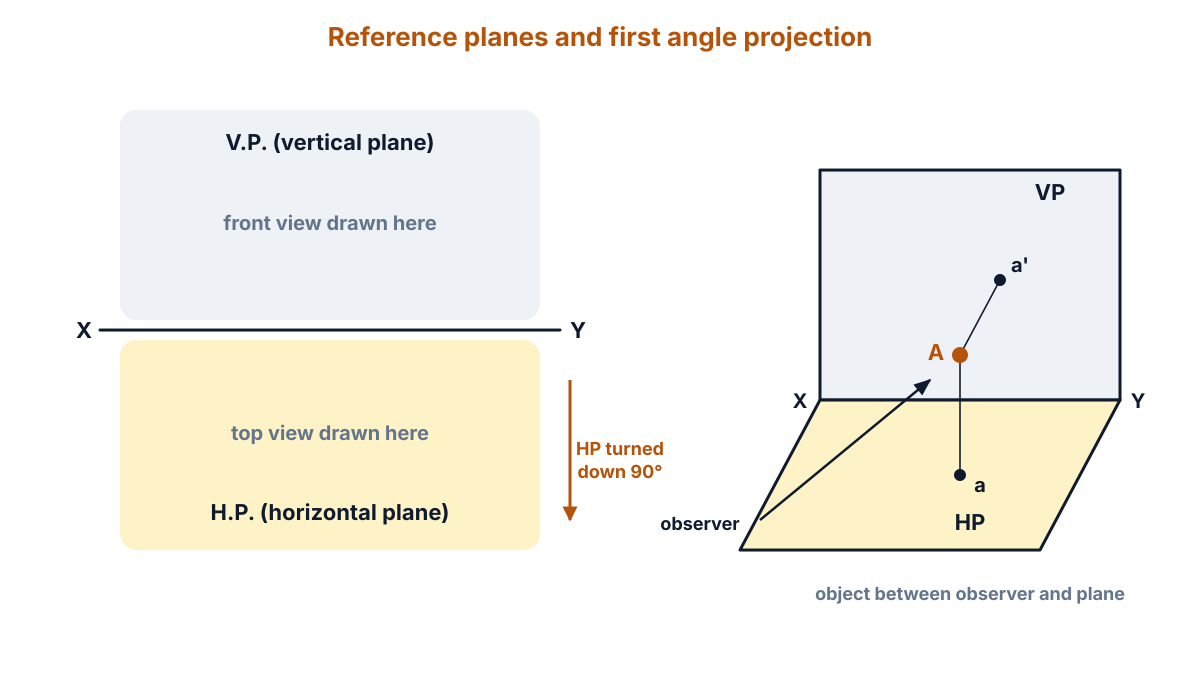
Figure Q4a: the VP and HP, the XY line, and first angle projection with the object between the observer and the plane.
Exam answer (5 marks)
The paper does not give the height of either end above HP, so this answer takes end A in HP (on XY). Any other height gives the same shapes, only moved up.
Steps:
- XY line: draw the reference line XY.
- Point a’: mark a’ on XY (A is in HP and in VP, so a and a’ both lie on XY).
- Front view: from a’ draw a’b’ = 65 mm at 45° to XY. This is the true length and true angle.
- Top view: draw a vertical projector from b’ down to XY to get b. The top view ab lies on XY, 45.96 mm long (65 × cos 45°).
- Finish: make a’b’ and ab thick, label a’, b’, a, b and the 45° angle, and write “first angle projection”.
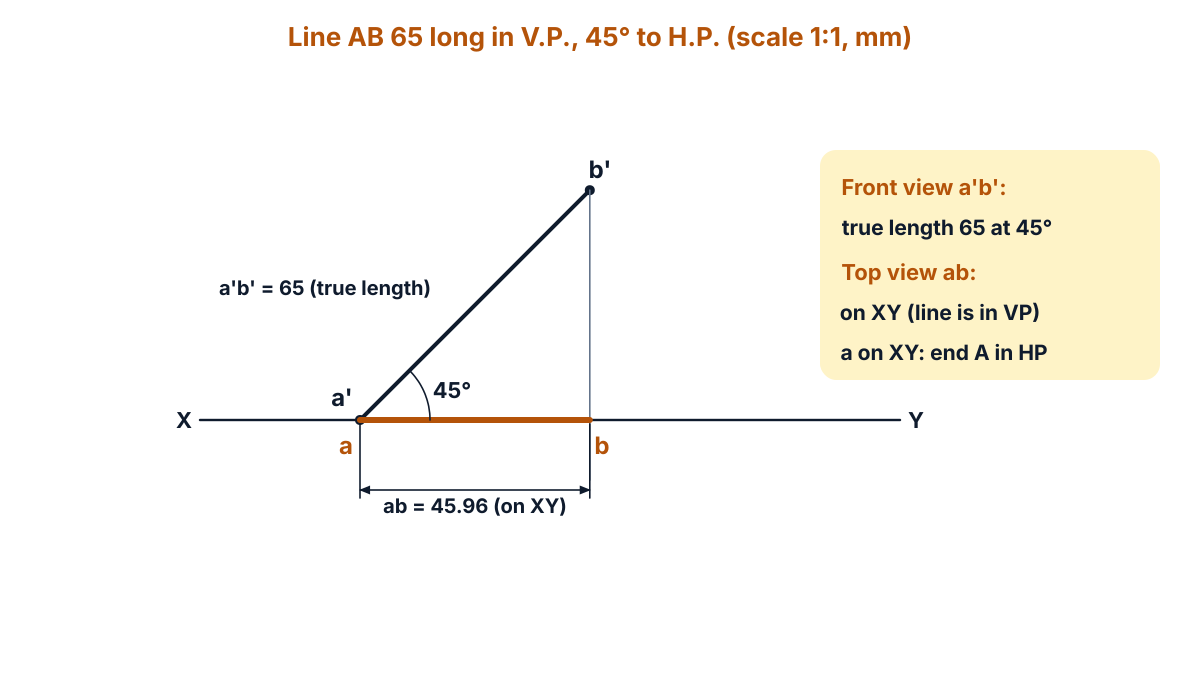
Figure Q4b: front view a’b’ at 45° (true length) and top view ab on XY (drawn to scale; draw it full size, scale 1:1, on your sheet, all dimensions in mm).
Answer: front view a’b’ = 65 mm at 45° to XY; top view ab on XY, 45.96 mm long.
Q5. A circle of 50 mm diameter roils along a line. (10 marks)
Question (as printed): 5. A circle of 50 mm diameter roils along a line. A point on the circumference of the circle is in contact with the line in the begining and after making one complete revolution. Draw the cycloidal path of the point.
“Roils” is a misprint for “rolls”, and “begining” for “beginning”.
Understand it first
- A cycloid is the path traced by a point on the rim of a circle that rolls along a straight line without slipping.
- Without slipping means the circle turns as it moves. In one full turn, its centre moves forward by exactly the circumference, πD.
- Here D = 50 mm, so the base line is π × 50 = 157.08 mm long. The radius is 25 mm.
- The point starts on the line (P₀). After half a turn it is at the top, 50 mm high. After one full turn it is back on the line (P₁₂), 157.08 mm away.
- The locus of the centre is a straight line parallel to the base line, 25 mm above it. The centre never goes up or down.
- We split one turn into 12 equal parts (30° each). In each part the centre moves 157.08 ÷ 12 = 13.09 mm.
- To find the point after k parts: put the circle’s centre at Ck. The point is 25 mm from Ck, and its height equals the height of division k on the starting circle. So an arc of radius 25 mm from Ck cuts the horizontal line through division k at Pk.
Put a chalk mark on a bicycle tyre. As you push the bicycle, the mark draws a row of arches on the ground. One arch is one turn of the wheel.
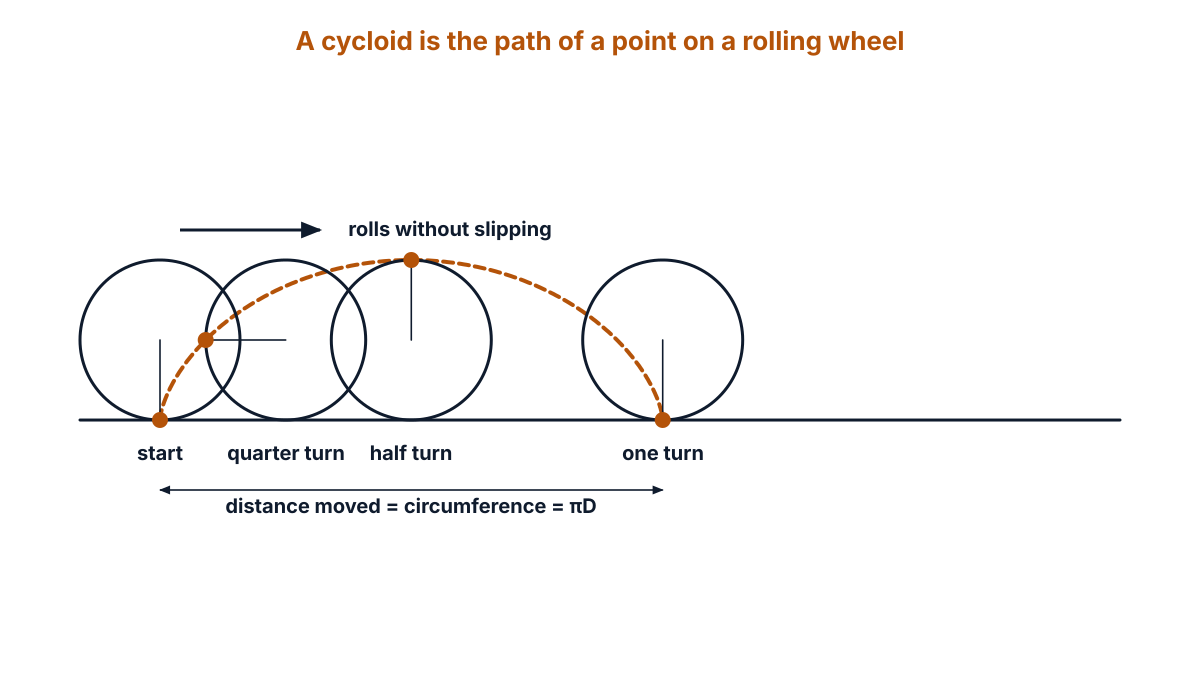
Figure Q5a: the marked point rises to the top at half a turn and lands again after one turn, πD further on.
Exam answer (10 marks)
Steps of construction:
- Circle: draw a circle of 50 mm diameter with centre C, touching a horizontal base line at P (P₀).
- Base line: from P draw the base line PA = πD = 3.1416 × 50 = 157.08 mm.
- Divide the circle: divide the circle into 12 equal parts (30° each) and number them 1 to 12 from P, going up the side away from the rolling direction.
- Divide the base line: divide PA into 12 equal parts of 13.09 mm each.
- Centre line: through C draw the locus of the centre, parallel to PA and 157.08 mm long. Draw verticals from the 12 division points of PA to mark C₁, C₂ … C₁₂ on it.
- Horizontal lines: through division points 1 to 11 of the circle, draw lines parallel to PA (each line serves two points, for example 1 and 11 share one height).
- First point: with C₁ as centre and radius 25 mm, cut the horizontal line through point 1 at P₁.
- Other points: in the same way, with C₂ … C₁₂ as centres and radius 25 mm, cut the lines through points 2 … 12 at P₂ … P₁₂. P₆ is the top point, 50 mm high, and P₁₂ falls on A.
- Curve: join P₀, P₁, P₂ … P₁₂ with a smooth freehand curve, then finish it with a French curve.
- Finish: make the cycloid thick, keep construction lines thin, label C, C₁ … C₁₂ and P₀ … P₁₂, and dimension πD = 157.08.
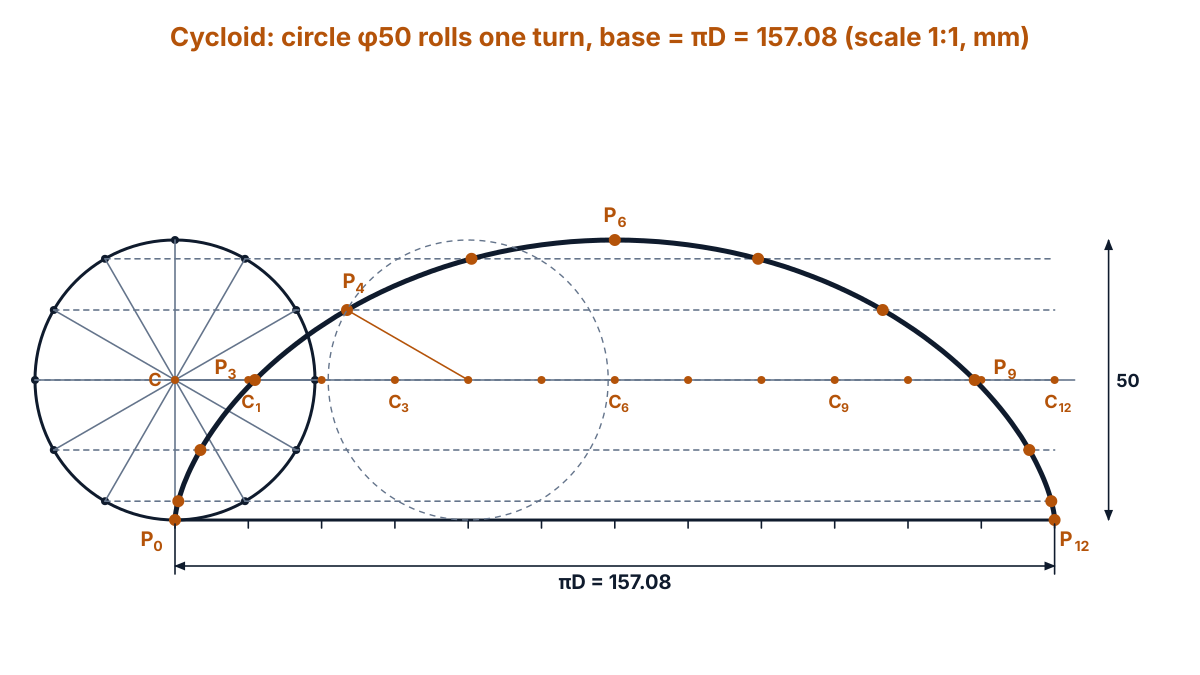
Figure Q5b: the cycloid traced by P for one revolution of a 50 mm circle (drawn to scale; draw it full size, scale 1:1, on your sheet, all dimensions in mm). The dashed circle shows the circle when its centre is at C₄.
Check your curve: P₃ is 25 mm high (level with the centre line) and P₆ is at the top, 50 mm high and 78.54 mm from P₀ (half of πD).
Answer: the cycloid is one arch 157.08 mm long (πD) and 50 mm high (D), from P₀ to P₁₂.
Exam tip: do not divide the base line into 12 equal parts by guesswork. Use the line-division method (draw an inclined line, step off 12 equal parts and join), because 13.09 mm is not a round number.
Q6. A rectangular plane of length 40 mm and breadth 30 mm is inclined at 30° to H.P. (10 marks)
Question (as printed): 6. A rectangular plane of length 40 mm and breadth 30 mm is inclined at 30° to H.P. Its shorter side being parallel to H.P makes an angle of 45° with V.P. Draw the projections of rectangular plane.
This plane is tilted to both HP and VP. The C-23 syllabus lists planes “up to planes perpendicular to one plane and inclined to other plane”, so this question goes one step further. It is solved below by the usual three-stage method.
Understand it first
- A plane here is a flat thin shape, like a sheet of card, 40 mm long and 30 mm wide. Name its corners A, B, C, D, with AD and BC the shorter (30 mm) sides.
- When a plane is parallel to HP, its top view shows its true shape. The front view is just a line.
- When the plane is tilted to HP but still at 90° to VP, its front view is a line at the tilt angle. The top view becomes shorter in one direction.
- The question has two conditions:
- the plane makes 30° with HP,
- the shorter side AD stays parallel to HP (so it can rest on HP) and makes 45° with VP.
- We cannot draw both conditions at once. So we draw in three stages: (1) true shape, (2) tilt to 30°, (3) turn the top view so that AD makes 45° with XY.
- Turning a view about a vertical axis does not change the top view’s shape. It only changes the front view. Heights do not change either.
Take a book lying on a table. Lift one edge so it tilts. Then turn the tilted book on the table. Seen from above it keeps its shape. Seen from the front it changes.
Exam answer (10 marks)
The paper does not give the positions, so take side AD in HP and 10 mm in front of VP.
Steps of construction:
- XY line: draw XY and plan three stages side by side.
- Stage 1, top view: draw the true shape abcd, 40 × 30, 10 mm below XY, with the shorter side ad at 90° to XY.
- Stage 1, front view: project it up. The front view is a line a’(d’) b’(c’) 40 mm long on XY.
- Stage 2, front view: redraw the line a’(d’) b’(c’), 40 mm long, inclined at 30° to XY, with a’(d’) on XY. Now b’(c’) is 20 mm above XY.
- Stage 2, top view: project down. The top view is a rectangle 34.64 mm (40 × cos 30°) by 30 mm.
- Stage 3, top view: redraw the stage 2 top view, the same size and shape, turned so that ad makes 45° with XY.
- Projectors: from a, b, c, d of the new top view draw vertical projectors up.
- Heights: from the stage 2 front view draw horizontal lines: a’ and d’ stay on XY; b’ and c’ are 20 mm above XY.
- Final front view: the projectors meet these lines at a’, b’, c’, d’. Join them to get the front view (a parallelogram).
- Finish: make the final top view and front view thick, keep stages 1 and 2 and projectors thin, and label every corner.
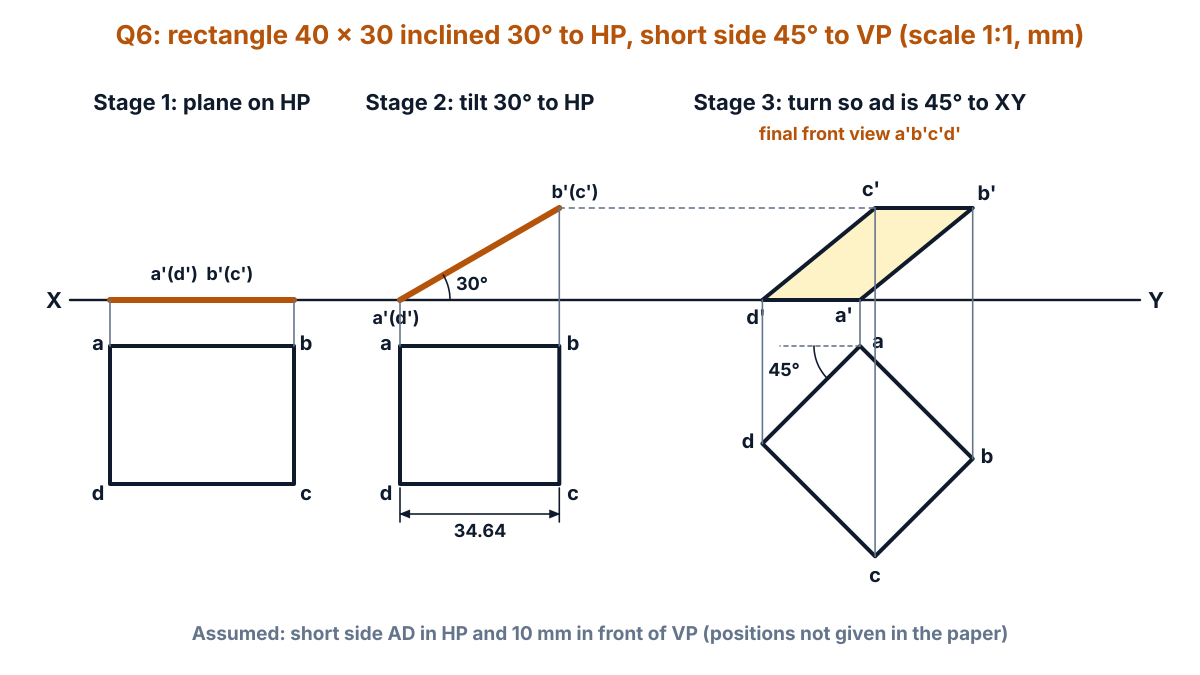
Figure Q6: three stages: true shape, tilted 30° to HP, then turned so ad is at 45° to XY (drawn to scale; draw it full size, scale 1:1, on your sheet, all dimensions in mm).
Answer: the final top view is the 34.64 × 30 rectangle with ad at 45° to XY; the final front view a’b’c’d’ is a parallelogram 20 mm high.
Q7. A right circular cone of base diameter 30 mm and axis 50 mm long lies in V.P. on a point of its base such that the axis is making an angle of 60° with V.P. (10 marks)
Question (as printed): 7. A right circular cone of base diameter 30 mm and axis 50 mm long lies in V.P. on a point of its base such that the axis is making an angle of 60° with V.P. Draw the projections of Cone.
Understand it first
- A right circular cone has a circular base and an apex (the tip) right above the centre of the base. The axis is the line from the base centre to the apex. Here the base is 30 mm across and the axis is 50 mm long.
- Generators are the straight lines on the cone’s surface from the base circle to the apex. We draw 12 of them, from 12 equal divisions of the base.
- “Lies in V.P. on a point of its base” means one point of the base rim touches the VP. Call it P.
- The axis makes 60° with VP. Since nothing is said about HP, keep the axis parallel to HP. Then the top view shows the true angle: the axis is at 60° to XY, and the base (which is at 90° to the axis) is at 30° to XY.
- Again we use two stages. Stage 1: axis at 90° to VP, base in VP. The front view is then a true circle. Stage 2: turn the top view about P until the axis is at 60° to XY.
- In stage 2 the base circle looks like an ellipse in the front view, because it is seen at a slant.
- Here the base faces the VP (away from you), so the part of the base rim on the apex side is hidden. It is drawn dashed.
Hold an ice cream cone flat with its open end against a wall. Turn it on the table so it points away from the wall at an angle. Seen from the front, the round opening now looks like an oval.
Exam answer (10 marks)
The paper does not give the height of the axis, so this answer keeps it 20 mm above HP.
Steps of construction:
- XY line: draw XY.
- Stage 1, front view: draw a circle of 30 mm diameter with centre o’ 20 mm above XY. Divide it into 12 equal parts.
- Stage 1, top view: the base is in VP, so its top view is a line 30 mm long on XY. Mark the apex o on the axis, 50 mm below XY. Join both ends to o.
- Stage 1 generators: project the 12 points down to the base line on XY and join each to o. Name the left end p (the point of the base that stays in VP).
- Stage 2, top view: redraw the stage 1 top view turned about p so that the axis makes 60° with XY. The base line is now at 30° to XY, with p still on XY.
- Stage 2 points: mark the 12 base points on the new base line at the same spacing as in stage 1, and join them to the new apex o.
- Projectors: from every point of the stage 2 top view, draw vertical projectors up.
- Heights: from the stage 1 front view draw horizontal lines through the 12 points and through o’. Heights do not change when you turn the top view.
- Front view: where each projector meets its horizontal line, mark the point. Join the 12 base points with a smooth ellipse, mark the apex o’ at 20 mm height, and draw the two outline generators from o’ tangent to the ellipse.
- Visibility and finish: draw the visible generators and the visible part of the base thick, and the hidden part of the base (on the apex side) dashed. Label p, p’, o and o’.
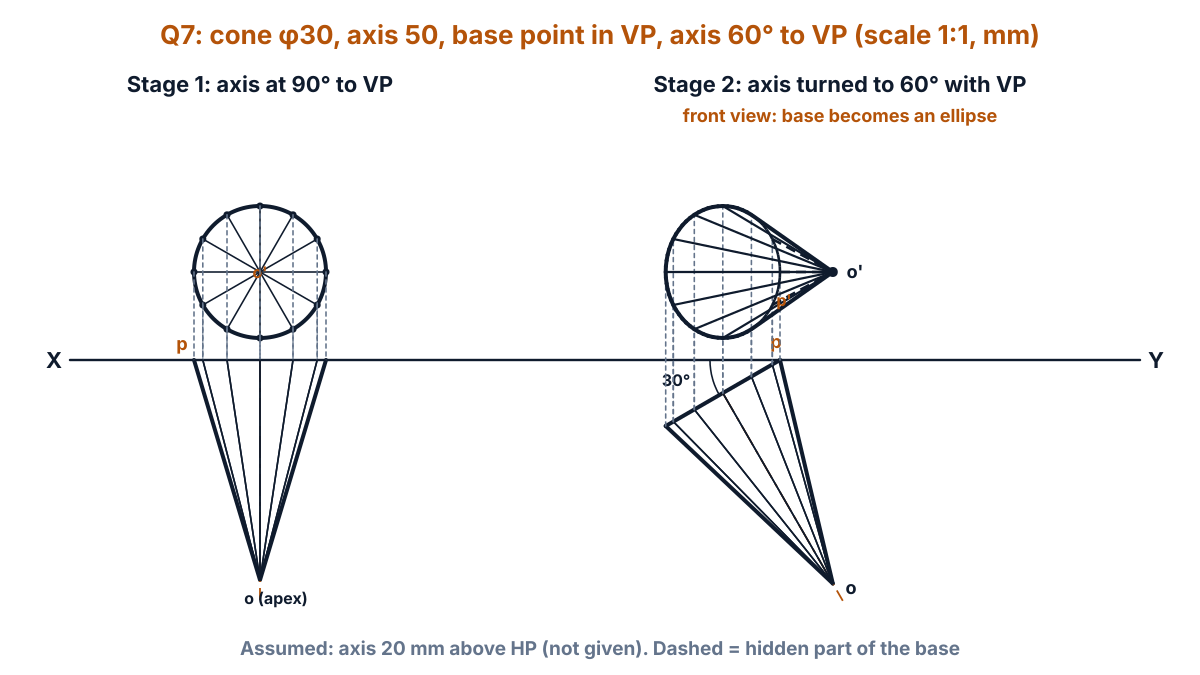
Figure Q7: stage 1 (axis at 90° to VP) and stage 2 (axis at 60° to VP); the base becomes an ellipse in the front view (drawn to scale; draw it full size, scale 1:1, on your sheet, all dimensions in mm).
Check your drawing: in the stage 2 front view the axis looks 25 mm long (50 × cos 60°), and the ellipse is 30 mm tall and 25.98 mm wide (30 × sin 60°).
Answer: top view: triangle with base line at 30° to XY and axis at 60° to XY; front view: base as an ellipse with apex o’, hidden part of the base dashed.
Q8. A square prism with a base side of 45 mm and axis length of 80 mm is resting in H.P. such that two of its vertical faces are equally inclined to V.P. (10 marks)
Question (as printed): 8. A square prism with a base side of 45 mm and axis length of 80 mm is resting in H.P. such that two of its vertical faces are equally inclined to V.P. It is cut by a section plane parallel to V.P, perpendicular to H.P and passing through midpoints of two adjacent sides of its base. Draw sectional front view and top view of the square prism.
Understand it first
- A square prism is a solid with two square ends and four rectangular side faces. Here each square side is 45 mm and the height (axis) is 80 mm.
- Resting in H.P. with the axis vertical means it stands on its base. Its top view is the true square.
- Two vertical faces equally inclined to VP means the faces make 45° each with VP. So the square in the top view is turned 45°, like a diamond, with one corner pointing to the front.
- A section plane (cutting plane) is an imaginary knife that cuts the solid. Here it is parallel to VP and at 90° to HP. So in the top view it is a line parallel to XY.
- It passes through the midpoints of two adjacent sides of the base. These are the two front sides of the diamond. So the plane cuts off the front corner.
- A sectional front view shows the solid after removing the part between you and the cutting plane. The cut surface is shown with hatching: thin parallel lines, preferably at 45°, as the BIS code on sections recommends.
- Since the plane is parallel to VP, the cut face is seen in its true shape in the front view. It is a rectangle as tall as the prism.
Cut a slice off the front of a block of paneer, knife upright and parallel to the wall. The fresh cut face you see is the section.
Numbers: the diagonal of the square is 45 × √2 = 63.64 mm, so each corner is 31.82 mm from the axis. The midpoints of the two front sides are 15.91 mm in front of the axis, and the distance between them is 31.82 mm. So the section is a rectangle 31.82 mm wide and 80 mm high.
Exam answer (10 marks)
The paper does not give the distance from VP, so this answer keeps the back corner 20 mm in front of VP.
Steps of construction:
- XY line: draw XY.
- Top view: below XY draw the square abcd of 45 mm side with two sides at 45° to XY (a diamond), corner b at the back and corner d at the front.
- Midpoints: mark the midpoints 1 and 2 of the two front sides ad and cd.
- Section plane: draw the cutting plane line X–X through 1 and 2, parallel to XY, as a chain line with thick ends and arrows pointing towards the back (the direction of viewing).
- Top view of the cut prism: draw the part behind the plane, a-b-c-2-1, thick. Show the removed front corner thin.
- Front view outline: project corners a and c up and draw the front view of the remaining prism: a rectangle 63.64 mm wide and 80 mm high.
- Section width: project points 1 and 2 up to get 1’ and 2’. The vertical lines through 1’ and 2’, 80 mm high, bound the cut face (31.82 mm wide).
- Hatching: hatch the cut face 1’2’ with thin lines at 45°, evenly spaced (about 3 mm apart).
- Hidden edges: the back vertical edge at b is behind the cut face. In a sectional view, leave hidden lines out.
- Finish: make the visible edges thick, label a’, c’, 1’, 2’, and write “SECTIONAL FRONT VIEW” and “TOP VIEW”.
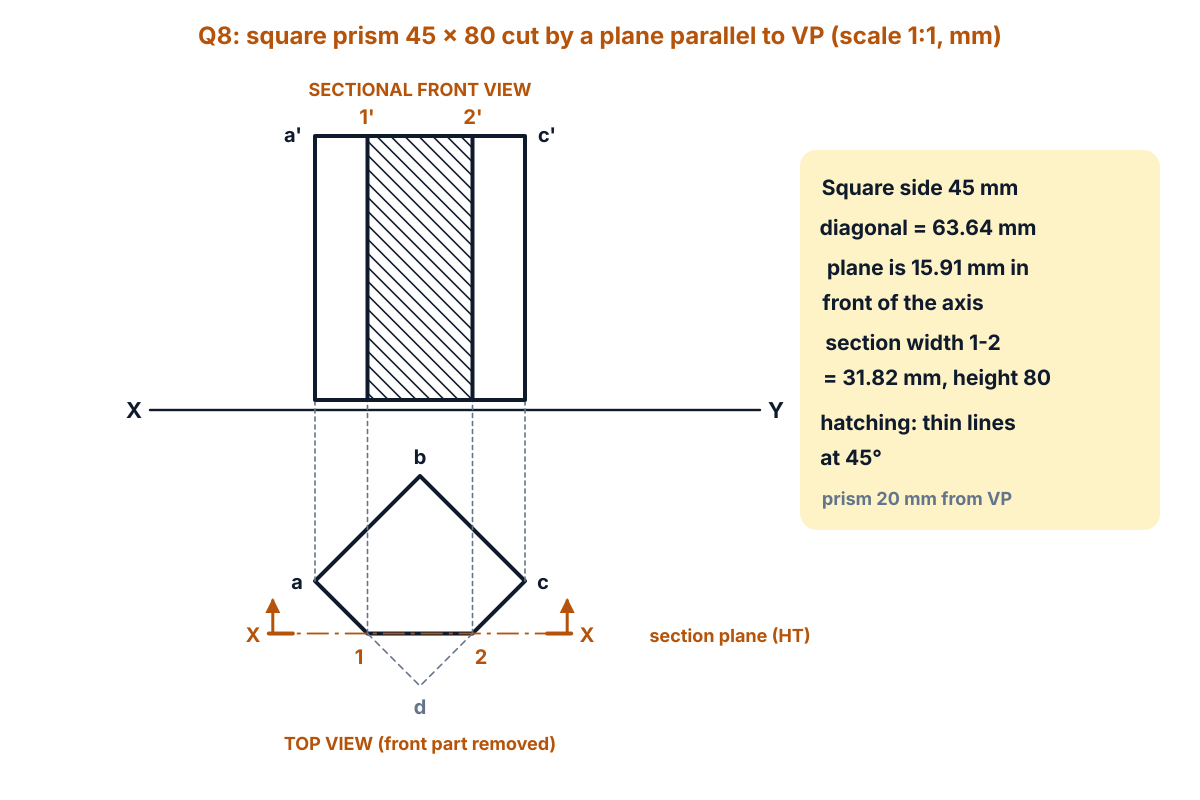
Figure Q8: top view with the section plane X–X, and the sectional front view with the cut face hatched (drawn to scale; draw it full size, scale 1:1, on your sheet, all dimensions in mm).
Answer: sectional front view 63.64 × 80 mm with a hatched rectangle 31.82 × 80 mm in the middle; top view a-b-c-2-1.
Exam tip: hatching goes only on the cut surface, never on the side faces seen behind it.
Q9. Draw front view, top view and left side view of the following object in the directions shown. (10 marks)
Question (as printed): 9. Draw front view, top view and left side view of the following object in the directions shown.
[Figure: a pictorial (isometric) view of a block with arrows marked “Top view”, “Front view” and “Left view”. Printed dimensions: 60, 30, 20, 30, 30 (slot depth), 20, 15, 20, 50 and 20.]
Understand it first
- Orthographic projection shows a solid object with flat views, each seen straight on from one side.
- The front view is seen in the direction of the “Front view” arrow. The top view is seen from above. The left side view is seen from the left, in the direction of the “Left view” arrow.
- In first angle projection the top view goes directly below the front view, and the left side view goes to the right of the front view.
- In the top view, the front of the object is at the bottom (farthest from XY). In the left side view, the front of the object is on the right (farthest from the front view).
- Visible edges are drawn thick. Edges hidden behind material are drawn as dashed lines.
- Reading this figure: the block is 80 long (30 + 20 + 30), 60 deep and 40 high. Its front face slopes at 45°. The left end has a low step 15 wide and 20 high. A top strip 50 long and 20 deep stands 40 high at the back. The right end, 15 wide, is 20 high. A slot 20 wide and 30 deep is cut through the slope.
- The slope is not given as an angle. It is read from the figure: it rises 20 over 20 at the left step and 40 over 40 under the top strip, so it is at 45°.
Imagine a toy block on your desk. Look at it from the front with one eye closed, then from above, then from the left. Each view is flat, like a photo taken straight on.
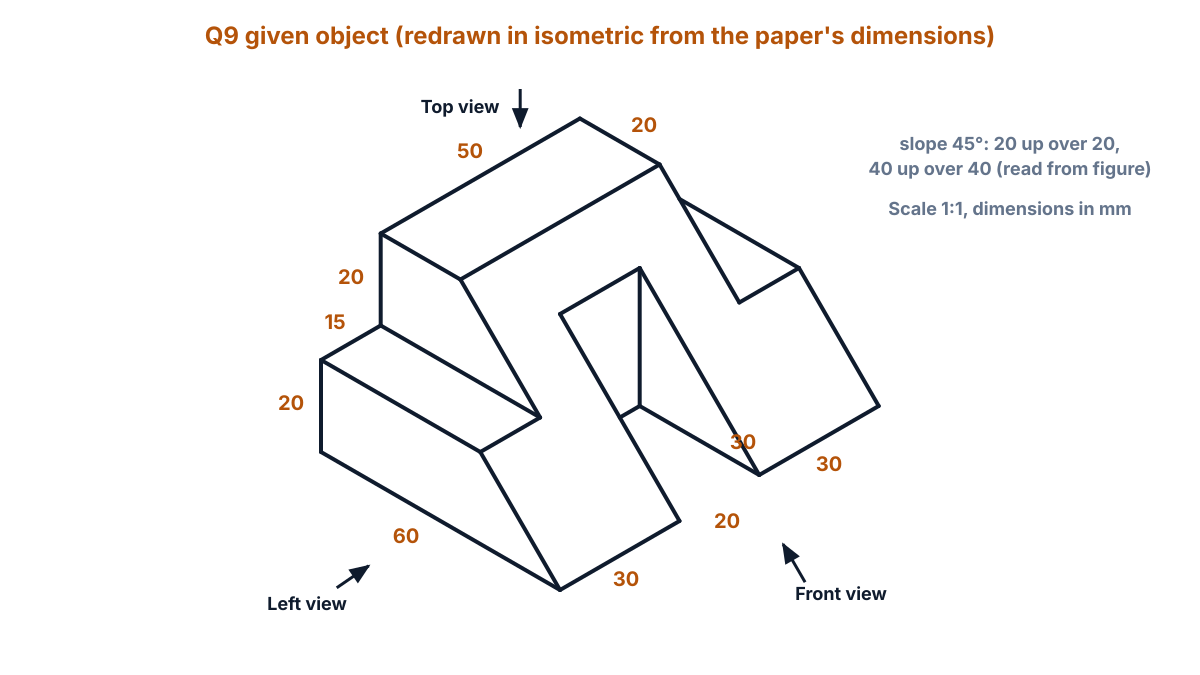
Figure Q9a: given figure (redrawn) from the paper’s dimensions, with the three viewing directions (scale 1:1, all dimensions in mm).
Exam answer (10 marks)
Steps of construction:
- Layout: draw XY. Leave room for the front view above it, the top view below it and the left side view to the right of the front view.
- Front view outline: draw the outline 80 wide: 20 high for the first 15 mm, 40 high for the next 50 mm and 20 high for the last 15 mm.
- Slot in front view: from 30 to 50 mm draw the slot as a rectangle 20 wide and 30 high (its back wall is 30 high, where the slope meets it).
- Top view outline: below XY draw a rectangle 80 × 60. Its back edge is nearest XY and its front edge is at the bottom.
- Slope lines in top view: draw the lines where the slope meets the flat tops: 20 mm from the front edge for the end parts (0 to 15 and 65 to 80), and 40 mm from the front edge for the middle part (15 to 65).
- Step lines in top view: draw the two lines at 15 and 65 mm from the left, running from the back edge to the 20 mm slope line of the end parts.
- Slot in top view: draw the slot 20 wide (30 to 50 mm) and 30 deep from the front edge.
- Left side view outline: to the right, draw the profile: 40 high at the back, a top 20 wide, then the 45° slope down to the front bottom corner, 60 wide in all. The back is on the left and the front on the right.
- Lines in side view: draw the step line 20 high from the back for 40 mm (to where it meets the slope). Draw the slot’s back wall, 30 from the front and 30 high, as a dashed hidden line.
- Finish: draw thin projectors between the views, make visible edges thick, add main dimensions (80, 60, 50, 40, 20), and label FRONT VIEW, TOP VIEW and LEFT SIDE VIEW.
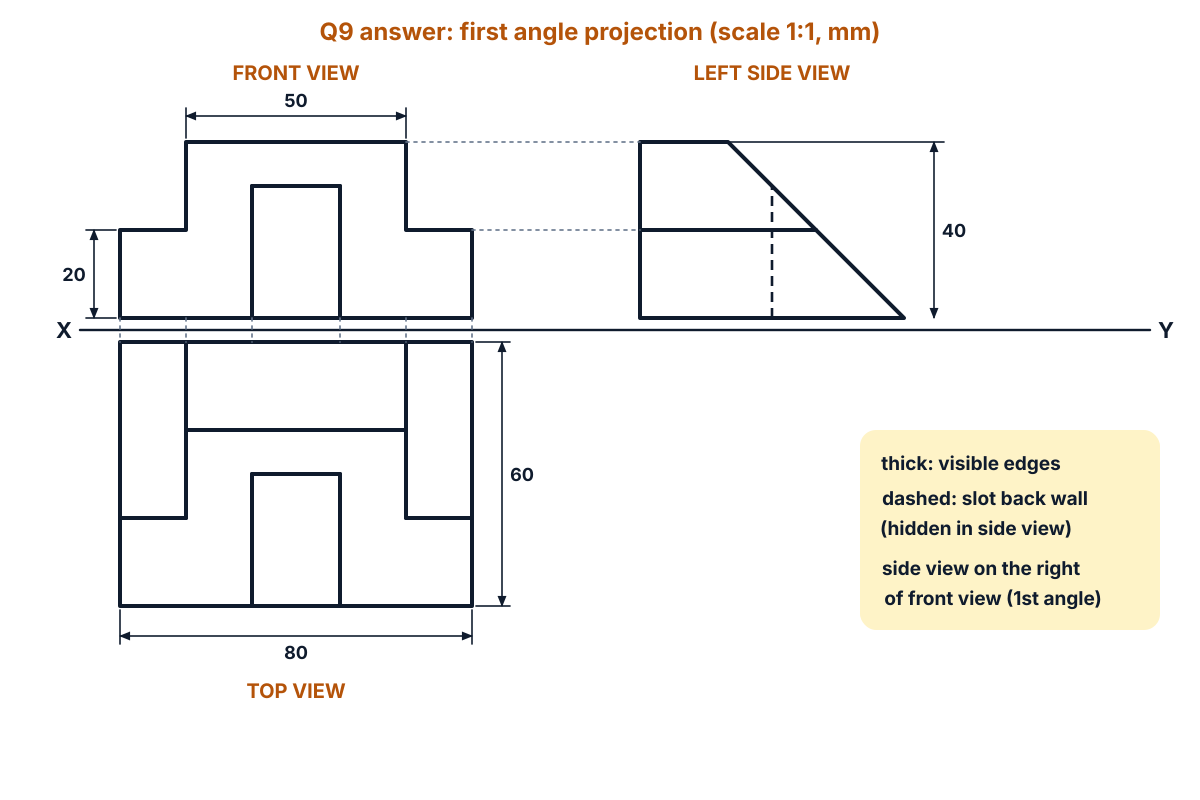
Figure Q9b: front view, top view and left side view in first angle projection (drawn to scale; draw it full size, scale 1:1, on your sheet, all dimensions in mm).
Answer: three views as in Figure Q9b: front view 80 × 40 with the stepped top and the slot; top view 80 × 60; left side view with the 45° slope and one hidden line.
Q10. Draw front view, top view and left side view of the following object in X, Y and Z directions respectively. (10 marks)
Question (as printed): 10. Draw front view, top view and left side view of the following object in X, Y and Z directions respectively.
[Figure: a pictorial (isometric) view of a block with arrows X, Y and Z. Printed dimensions: 50, 50, 35, 10 (base), 20, 10, 20 (along the top), 20 (top depth), 10 (rib width) and 10 (notch floor above the base).]
Understand it first
- The arrows tell you where to look from. X gives the front view, Y (from the top) gives the top view, and Z gives the left side view.
- Reading this figure: a base 50 × 50 and 10 thick. At the back, a block 20 deep rises to 35 mm. Its top has a notch 10 wide in the middle, with the two tops 20 wide on either side.
- The notch floor is 10 mm above the base top, so it is 20 mm above the bottom. The notch is 35 − 20 = 15 mm deep.
- Two ribs (thin supports), each 10 wide, run along the left and right sides. Their top surfaces slope from the front edge of the base (10 high) up to the top of the back block (35 high).
- Between the ribs, the top of the base is flat and open.
- The slope of the ribs is read from the figure: it starts at the front edge of the base top and ends at the front of the back block, 30 mm back (50 − 20).
- In the left side view, the notch, the back block’s front face and the base top between the ribs are all behind the left rib. So they appear as dashed hidden lines.
Picture a small office letter-holder: a back wall with a slot in it, and two sloping side arms. Looking from the side, the arm hides everything behind it.
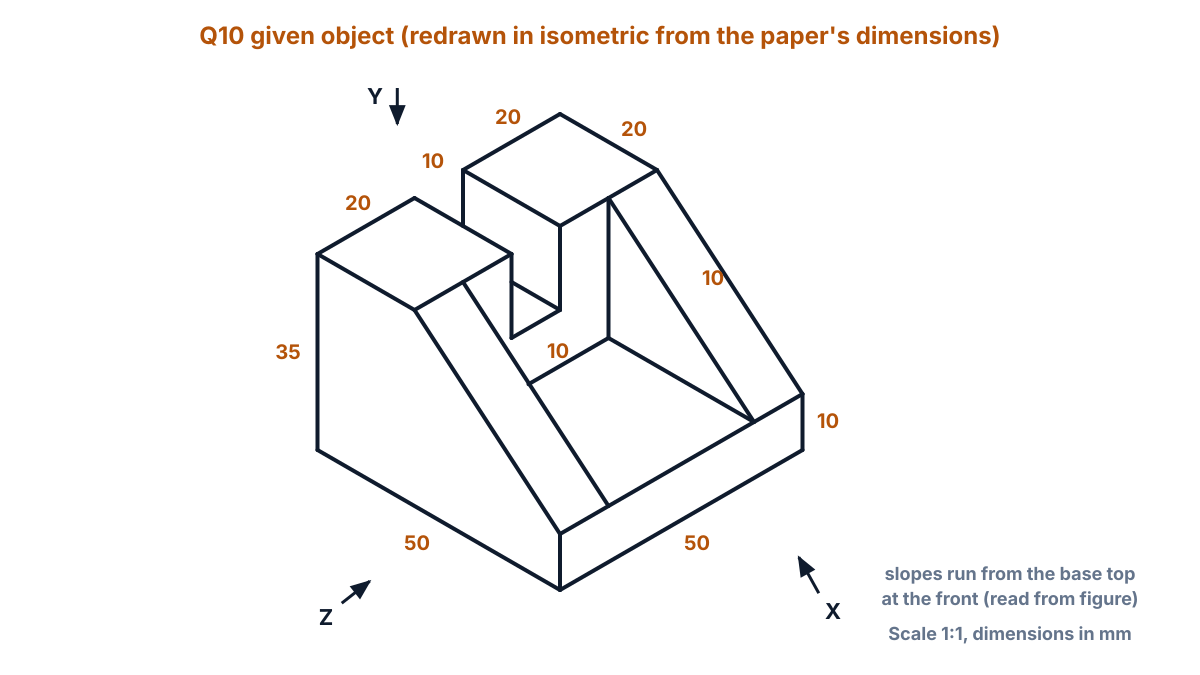
Figure Q10a: given figure (redrawn) from the paper’s dimensions, with the X, Y and Z directions (scale 1:1, all dimensions in mm).
Exam answer (10 marks)
Steps of construction:
- Layout: draw XY, with room for the front view above, the top view below and the left side view to the right.
- Front view outline (X): draw the outline 50 wide and 35 high, with the notch 10 wide (from 20 to 30 mm) cut down to 20 mm height.
- Lines in front view: draw the base line at 10 mm height across the full width, and the rib lines at 10 and 40 mm from the left, from 10 up to 35 mm.
- Top view outline (Y): below XY draw a square 50 × 50, back edge nearest XY.
- Back block in top view: draw a line 20 mm from the back edge (30 mm from the front) across the full width.
- Ribs in top view: draw the rib lines at 10 and 40 mm from the left, from the front edge to the line at 30 mm.
- Notch in top view: draw the notch lines at 20 and 30 mm from the left, from the line at 30 mm to the back edge.
- Left side view outline (Z): draw the profile 50 wide: 35 high at the back, a top 20 wide, the slope down to 10 high at the front, then down to the bottom. The back is on the left.
- Hidden lines in side view: draw dashed lines for the notch floor (20 high, over the back 20 mm), the back block’s front face (vertical, 30 from the front, from 10 to 35 high) and the base top between the ribs (10 high, over the front 30 mm).
- Finish: add thin projectors, the main dimensions (50, 50, 35, 10), and label FRONT VIEW (X), TOP VIEW (Y) and LEFT SIDE VIEW (Z).
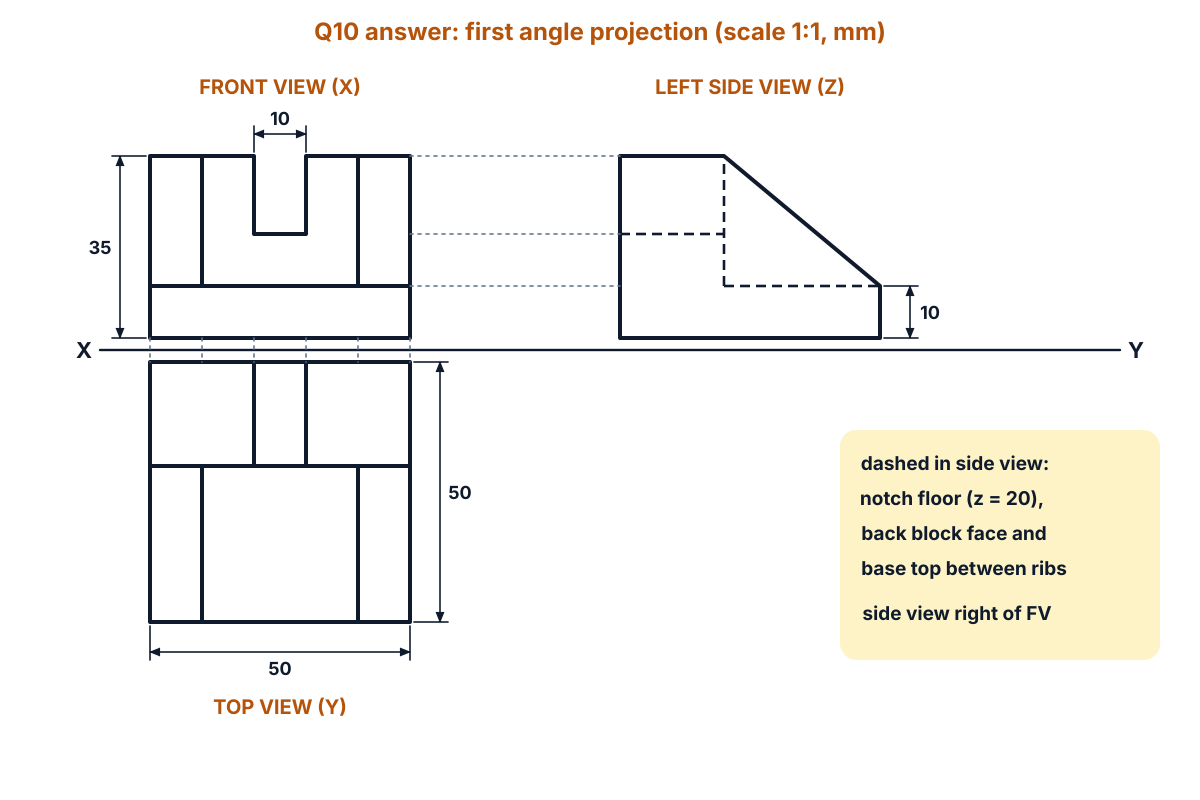
Figure Q10b: front view (X), top view (Y) and left side view (Z) in first angle projection (drawn to scale; draw it full size, scale 1:1, on your sheet, all dimensions in mm).
Answer: three views as in Figure Q10b: front view 50 × 35 with the notch; top view 50 × 50 with rib and notch lines; left side view with the rib slope and three hidden lines.
FAQ
Which four Part B questions should I choose in the EE-107 October 2024 paper?
Q5 (cycloid), Q8 (section of a square prism), Q9 and Q10 (orthographic views) are the safest four. Q5 and Q8 have fixed construction steps, and Q9 and Q10 only need careful reading of the pictorial figure. Take Q7 (cone) in place of Q9 or Q10 if you have practised two-stage solids. Q6 is the hardest because the plane is inclined to both HP and VP.
Which chapters carry the most marks in this Engineering Drawing paper?
Chapter 3 (projections of points, lines, planes and solids) carries 25 marks: Q4, Q6 and Q7. Orthographic projection (Chapter 5) carries 20 marks (Q9, Q10), geometric constructions 15 (Q3, Q5), and Chapters 1 and 4 carry 10 each. With the Part B choice these add up to 80, the same as the C-23 weightage.
The slot in the Q2 figure has no depth dimension. What should I do?
The paper prints the slot height (20 mm) but not its depth. When you scale the printed figure, the depth comes to about 20 mm, so draw it as 20 mm and write that you scaled it. Do not leave the slot out, and keep every printed dimension exactly as given.
Are there misprints in this paper?
Yes. Q5 prints “roils” for “rolls” and “begining” for “beginning”. Neither changes the question: the circle rolls along a line for one full turn and you draw the cycloid. Q6 and Q8 also write “H.P” and “V.P” without the last full stop, which is only a printing style.
Where do the top view and left side view go in first angle projection?
In first angle projection the top view goes directly below the front view, and the left side view goes to the right of the front view. The XY line separates the front view from the top view. All three views are joined by thin projectors, so every point lines up across the views.
Sources
- AP SBTET C-23 EE-107 Engineering Drawing question paper, Oct-Nov 2024
- C-23 Curriculum, Diploma in Electrical and Electronics Engineering, SBTET AP
- Reference books (C-23 syllabus):
- P.I. Varghese: Engineering Graphics, McGraw-Hill
- Basant Agarwal & C.M. Agarwal: Engineering Drawing, McGraw-Hill
- N.D. Bhatt: Engineering Drawing
- TTTI Madras: T.S.M. & S.S.M. on Technical Drawing
- SP-46-1998, Bureau of Indian Standards
- SP 46:2003 Engineering Drawing Practice for Schools and Colleges, Bureau of Indian Standards (lettering, dimensioning, sections)
Writes and reviews the SBTET EEE Papers solutions: AP SBTET diploma question papers answered step by step from the prescribed syllabus.